The kringla (pronounced “Kryng-LAH”) is one of Norway’s most iconic desserts, but you probably haven’t had much opportunity to try this classic since it has been replaced by more modern pastries.
What Is The Kringla Recipe?
The kringla was originally made with a combination of flour, butter, eggs, sugar, and milk or cream.
The egg yolks were beaten into the mixture before being folded through the rest of the ingredients.
It was then rolled out between two sheets of parchment paper until thin enough to cut into shapes.
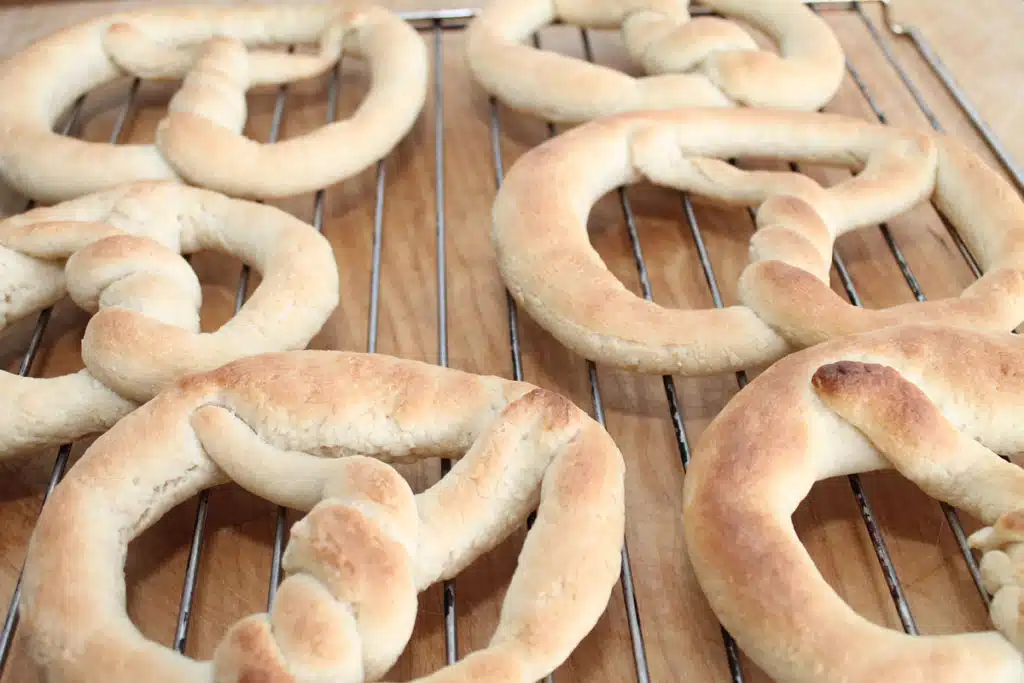
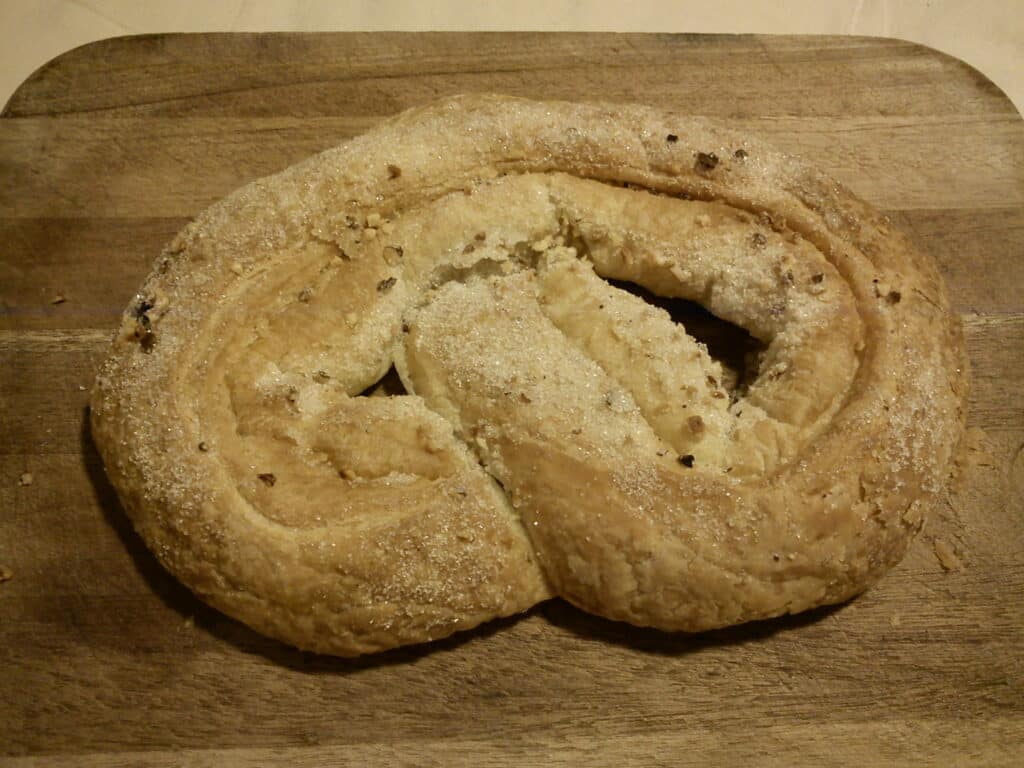
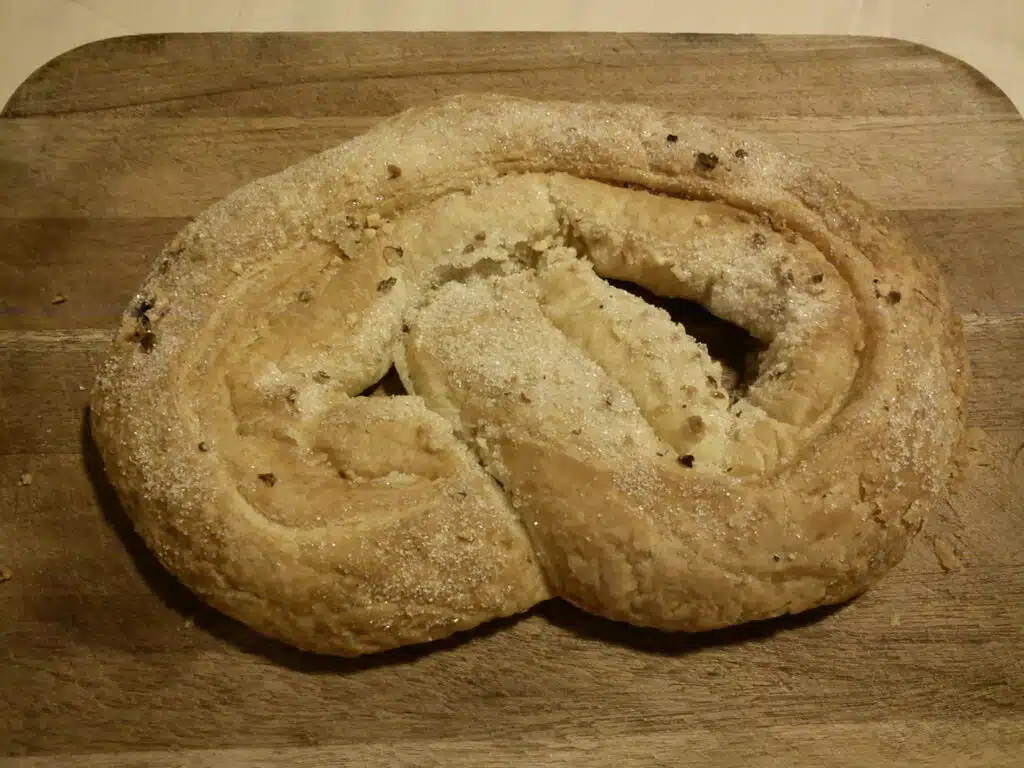
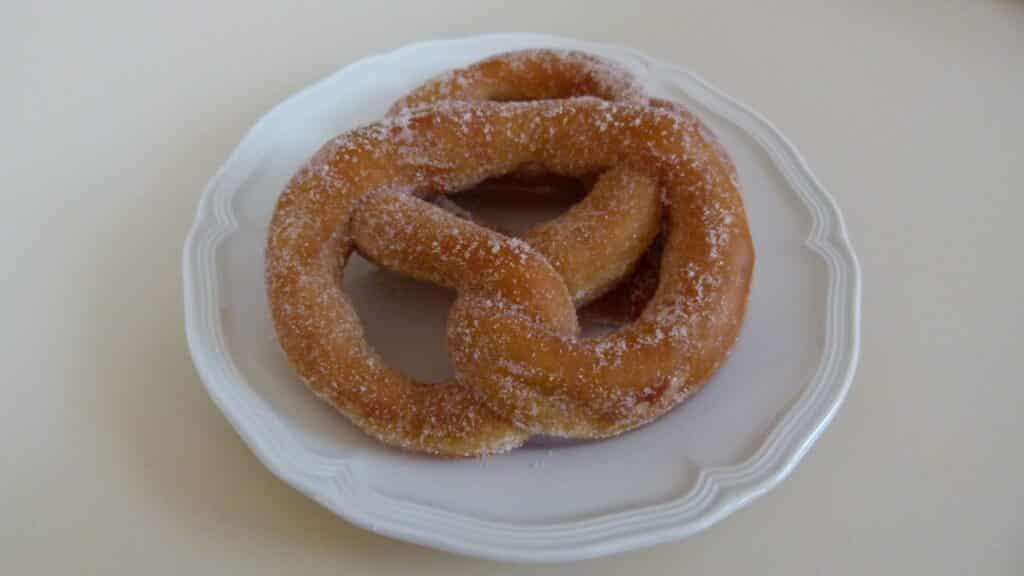
These shapes could be round like a pinwheel, spiral, or square, and they would have a hole at their center, allowing them to be tied together to form knots.
This process takes time, so when people wanted something quick to eat, the dough was simply filled with a sweet filling like jam, chocolate, or whipped cream instead of being knotted.
Eventually, people started replacing the filling with nuts, which gave the kringla its name–kringle means “crown” in Danish.
As time passed, the kringla evolved from a simple dessert into an elaborate meal, complete with a soup course, meat entrée, side dishes, and even coffee.
It became a tradition for Norwegians to celebrate Christmas Eve with a feast featuring all these components as well as kringles.
These days, the kringla isn’t just eaten on holidays—it’s also served regularly during other occasions including birthdays, anniversaries, graduations, weddings, and funerals.
In fact, there are several different varieties of kringles depending on what kind of event you want to commemorate, such as wedding cakes and birthday cakes.
Today, the kringla is still baked over open flames, but there are now machines available to help simplify the process.
You can buy pre-made kringles from bakeries, but if you want to learn how to make your own, read below!

How Do You Make Kringla?
A knäckebröd (knäcked bread), or kringla, is made from an open-faced sandwich filled with whipped cream and topped with marzipan and almonds.
It can be served as dessert or breakfast food, and depending on where you live, it may also be known as a kranska, krondel, croissant, or kringle.
In Norway, kringla was traditionally baked every Christmas Eve.
The tradition stems back centuries, when peasants would bake them during their long winter nights.
Today, they often use puff pastry instead of yeast dough, but there isn’t anything wrong with using fresh yeast dough if you prefer it!
There are several different ways to make a kringla, including making a homemade yeast dough, using frozen puff pastry sheets, and even buying premade ones at grocery stores and bakeries.
If you want to learn how to make your own kringla, keep reading below to find out what the kringla recipe looks like.
Ingredients
- 1/4 cup milk
- 1/2 teaspoon sugar
- 1 egg
- 1 tablespoon butter
- 4 cups flour
- 1 1/2 teaspoons salt
- 1/2 cup raisins
- 1/4 cup chopped nuts
- 1 package powdered sugar
- 1 stick softened butter
- 1/4 cup heavy whipping cream
- Almond paste or marzipan
- Chocolate coating
Steps to Make Kringla Recipe
Here’s what you need to know about baking kringla:
- Pour the milk into a bowl and add the sugar. Stir until well combined.
- Add the egg and stir again.
- Melt the butter over low heat.
- Sift the flour and salt together.
- Stir the wet ingredients into the dry ingredients.
- Mix in the raisins, nuts, and powdered sugar.
- Cover the bowl with plastic wrap and let sit overnight so the mixture rises.
- On the next day, cut the butter into small pieces and melt the pieces in a separate bowl over a pan of boiling water. Once melted, remove the bowl from the stovetop and set aside to cool.
- After the butter has cooled down, mix in the heavy whipping cream.
- Roll out the dough onto a lightly floured surface and place it flat on top of a greased sheet tray. Cut off the excess dough around the edges and then roll up the remaining dough into a log. Place the log seam side down on the prepared sheet tray and cover with a clean kitchen towel.
- Let rise for another hour before preheating the oven to 350°F degrees while preparing the filling.
- With a knife, score the rolled out dough into 10 equal sections. You will have two rounds left after scoring.
- Spread almond paste evenly across both rounds of dough.
- Place the second round of dough atop the first and press down firmly to seal the layers together.
- Cut each section in half lengthwise. Then cut each half crosswise into 3 strips.
- Bake the kringlas for 40 minutes or until golden brown.
- Remove the kringles from the oven and allow them to cool completely before serving.
What Are The Ingredients In Kringla?
You can find many different recipes online, with some even calling for raisins or chocolate chips as an optional addition.
But if you want to stick with the original flavors, then these are the basic ingredients you need to know about when making your own kringla:
- Flour – 2 cups flour
- Butter – 1 cup butter
- Egg – 4 eggs
- Milk – 3/4 cup milk
- Vanilla extract – 5 teaspoons vanilla extract
- Sugar – 1 cup sugar
- Salt – 1 teaspoon salt
- Baking powder – 1 tablespoon baking powder
If you have access to fresh cream instead of milk, then you should use that as well.
How Long Does It Take To Make Kringla?
It takes about 30 minutes from start to finish including baking time.
It should be noted though, that if your dough is not rolled out perfectly thin, then it will bake up very unevenly.
This results in a kringle with some parts being crispy while other parts are still undercooked, which may result in one or two pieces falling apart during consumption.
If you have a large enough baking sheet, you can cut the kringle into smaller portions without having to worry so much about it falling apart during cooking.
Ingredients
- 4 cups flour
- 1 tablespoon sugar
- 1/2 teaspoon salt
- 4 tablespoons butter, cold and cubed
- 1 egg, lightly beaten
- 1 cup milk, room temperature
- Flour for rolling
Directions
Mix all dry ingredients together well. Cut butter into small cubes and add them to the dry mixture.
Combine everything until it forms a ball.
Turn the dough onto a clean work surface and knead gently for 10 seconds, just to incorporate air into the dough.
Divide the dough into 4 equal balls.
Roll each piece of dough on a flat surface using a rolling pin as thinly as possible.
The goal here is to get the dough as smooth as possible.
I used an 8 inch cookie cutter to create my circles, but you could use anything round like a glass or a bowl.
Place each circle onto a baking sheet lined with parchment paper.
Bake at 350 degrees F for 12 minutes.
Remove from oven and allow to cool completely before moving onto the next step.
What Is The History Of Kringla?
This sweet treat originated as an open-faced cookie with some sort of filling inside.
However, over time, the kringla evolved into something completely different – a triangular puff or waffle made from dough, filled with whipped cream, jam, chocolate sauce, etc., and then decorated with icing.
The kringla was originally referred to as a krumpli (Norwegian for “crumpet”), which eventually became kringle (or Kristneleg).
Today, the kringla is still widely served on major holidays such as Christmas Eve, New Year’s Eve, Easter Sunday, Midsummer Night, and St. John’s Day.
It can be found at many bakeries and restaurants during these times, although it has largely been relegated to being just another item on the dessert menu.
If you are looking to recreate this classic dish, we have all of the information you need right here!

How Did The Kringla Recipe Come About?
It was first created during the 18th century as a way of using up leftover bread dough from making other baked goods.
The Norwegian word “kringle” refers to a type of thickened dough used in baking.
By tying these together, they form what looks like a knotted rope or belt.
Kringles are traditionally served with coffee after dinner on Christmas Eve.
They can also be made year round if you have some left over dough.
The original kringle didn’t include butter, chocolate, raisins, nuts, or cinnamon.
It contained only flour, sugar, eggs, and milk.
However, the ingredients were gradually added over time until today we find them all in our version of the treat.
If you want to make your own kringle, here’s how to do so at home!
Why Is Kringla A Popular Recipe?
Traditional Nordic baking tends to be made with butter, sugar, eggs, flour, and milk.
The kringla is no exception.
It requires all four ingredients plus yeast to make a tasty, flaky dessert.
But why would someone choose to use yeast over other leavening agents like chemical raising agents or sourdough starter?
You might ask yourself how these two recipes could possibly taste different, when they both require similar ingredients and procedures.
To answer your question we need to look at what makes up kringle versus its alternative.
We can start by looking at the main components of each recipe.
Both versions call for butter, which is an ingredient that is common across many types of baked goods.
Next comes the sugar, which provides sweetness.
In the case of kringle, however, the sugar is not only used as a sweetener, but also acts as the binding agent for the dough.
Kringle uses less flour than its alternative because there isn’t enough gluten in the dough to hold everything together without help from the sugar.
Finally, we have the eggs.
Eggs provide moisture, along with protein, fat, vitamins, and minerals.
They also add richness and flavor, especially if they are whipped before being added to the mixture.
Although kringle doesn’t contain as much flour as its alternative, it still contains plenty.
To compensate, kringle relies on the addition of yeast instead of using chemical raising agents.
Yeast is alive, so it will continue to work until it runs out of energy.
When you bake bread, you don’t want to wait for it to rise, so you add yeast directly into the batter.
As long as the temperature stays above 65 degrees Fahrenheit (18 C), the yeast will produce carbon dioxide gas bubbles that expand throughout the dough.
These bubbles keep the dough rising even after the oven is turned off.
This process is called proofing, and it’s responsible for providing a lot of the airiness found in yeast-based products such as bread, rolls, cakes, and cookies.
Once the yeast starts producing CO 2, it continues to do so until it dies down or is removed from the mixture.
In the case of kringle, a little bit of yeast goes a long way.
That’s because the yeast needs time to get going before it begins to produce CO 2.
So rather than adding large amounts of yeast right away, you first let the yeast sit in warm water for several hours.
When you combine warm water and yeast, the combination forms a thick paste.
If you leave the mixture alone while it sits overnight, the next morning you should see a layer of foam floating on top of the liquid.
This indicates that the yeast has begun working and creating CO 2 bubbles.
At this point, the amount of CO 2 produced is quite small.
But by leaving the mixture undisturbed overnight, the yeast will eventually die down and release more CO 2.
By the next day, the mixture should look very bubbly and frothy.
If you don’t give the mixture time to rest overnight, you risk ending up with flat kringle instead of fluffy ones.
While waiting for the yeast to create the proper level of CO 2, you can prepare the rest of the ingredients.
What Are Some Of The Benefits Of Making Kringla?
If you have never heard about kringla before, then let me introduce you to what makes this Scandinavian treat so special — its rich history as an important part of Christmas celebrations in Norway.
The kringla was originally made to be eaten during Advent season, which is the period between Christmas day and Epiphany.
- This dish has been described as having both savory and sweet flavors because of the use of pork fat, eggs, and sugar.
- It tastes great when served warm.
- You can also make kringla with almonds instead of raisins.
- There are several different ways to prepare this delicious dessert, including baking or frying it.
- When preparing the dough for your kringla, remember to keep the butter cold! You may want to place the bowl in the freezer while working on the rest of the ingredients.
- For best results, do not overwork the dough. If you find the dough too sticky, add flour gradually until it becomes less sticky.
- Use fresh milk to create the custard filling.
- Make sure that the custard mixture does not boil after adding the egg yolks.
- Once ready, serve the kringla immediately after cooking.
How to Make Kringla Recipe
Here is how you can easily make your own kringla using this simple recipe.
- In a large mixing bowl, combine all dry ingredients together.
- Add the chilled butter into the bowl, cut into small pieces.
- Mix well with hands until the butter is evenly distributed throughout the dry ingredients.
- Place the mix onto a piece of plastic wrap, form a ball and roll out the dough until it reaches 1/4 inch thickness.
- Cut into desired shapes (like rings). Place the ring shaped dough onto a greased pan.
- Cover with another piece of plastic wrap, put in the fridge for at least 30 minutes.
- Preheat oven to 350F degrees Fahrenheit.
- Remove the top layer of plastic wrap from the kringla and spread the custard filling evenly inside the center.
- Bake the kringla for 20 – 25 minutes. Remove from the oven, allow to cool slightly and serve. Enjoy!
What Are Some Of The Drawbacks Of Making Kringla?
While many people love kringla because they enjoy its buttery flavor and soft texture, others may not be as enthusiastic about eating something made with so much butter or cream cheese.
If you don’t want to use such high amounts of fat, then you might consider using less.
Just make sure that you still have enough structure to keep your kringla from coming apart when cutting into bite sized pieces.
Another issue is that kringla can get very expensive if you buy all of the ingredients separately.
Fortunately, you don’t need to spend quite that much money to make this dessert at home.
You can save yourself hundreds of dollars by buying only what you really need, which means that you won’t feel too bad when you finish the entire batch!
The main thing that you need to remember is that a lot of things go together well in cooking, including butter, cream cheese, flour, sugar, eggs, milk, oats, vanilla extract, baking powder, and salt.
By combining these items, you will be able to create an amazing kringla without breaking the bank.
Is There Anything Else You Would Like To Know About Kringla?
Yes! Here are some interesting facts about kringla that might surprise you:
- In the 19th century, kringla were served at royal banquets as part of a three course meal.
- Norwegian immigrants brought their love of kringla with them when they moved to America during the 1800s.
- Today, you can find kringlas in bakeries across all 50 states.
- In addition to being delicious, kringla also have health benefits. They contain antioxidants, fiber, vitamins A, C, E, and K, magnesium, calcium, zinc, iron, copper, manganese, potassium, phosphorus, B6, niacin, riboflavin, thiamine, folic acid, choline, pantothenic acid, and selenium.
- You can make your own kringla dough, or buy ready made from many different stores. It comes either frozen or refrigerated and doesn’t require rising time. You can use store bought dough if you want to save yourself the hassle of kneading it together.
Equipment
- 1 Oven
- 1 Bowl
Ingredients
- 1 cup heavy cream
- 1 cup sour cream
- ⅓ cups sugar
- 2 tablespoon shortening
- 1 large egg yolk
- 1 teaspoon vanilla extract
- 2 teaspoon baking powder
- 1 teaspoon baking soda
- ¼ teaspoon salt
- 3 cups all-purpose flour
Instructions
- Start by combining the heavy cream and sour cream in a small bowl the night before. Cover with cling film and chill after whisking until smooth.
- one cup each of heavy cream and sour cream
- Set the cream mixture out to warm up when you're ready to begin. Then, set your oven's temperature to 475°F (246°C) and prepare your baking sheets by lining them with parchment paper or silicone baking mats.
- Cream the sugar, shortening, and egg yolk in a large basin.
- The cream mixture should now contain the vanilla extract, baking powder, baking soda, and salt. Next, add the wet ingredients to the sugar that has been creamed. Combine thoroughly after mixing. The dough should be sticky after adding the flour and being fully combined. To make the next process easier, you can chill the dough for an hour before handling it.
- Use a well-floured surface to roll out the dough because it is sticky. Pull off bits of dough that are about 1 12 inches in diameter and form them into balls. Coat each ball completely in flour. When there is less flour on that side of your work surface, move the dough pieces there and roll them into a rope shape (approximately 8-9 inches long). You can fold the rope over like a pretzel, shape it into a “infinity sign” or a “8,” or form it into spherical coils, but these take longer to bake.
- Place each piece of dough that has been shaped onto the baking sheets that have been preheated. Bake for 5 to 6 minutes, or until the bottoms are just starting to turn a light golden colour. The amount of time needed to cook can vary depending on how thick the “ropes” are.
- When done, take the baking sheet out of the oven and let it cool for approximately five minutes before moving it to a wire cooling rack to finish cooling.
Video
Nutrition
My blog is all about creating delicious meals with ingredients that are easy to find in your local grocery store. I’m passionate about making yummy meals that I can share with my friends and family.