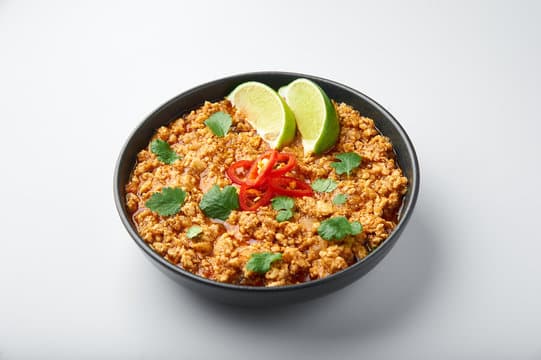
Chicken keema is an Indian dish made from ground meat mixed with onions and spices.
The name means “little chick” or “baby goat,” so this spicy curry has all the flavors of a traditional lamb stew.
With its simple yet flavorful flavor profile, chicken keema makes a great meal to serve your family on busy weeknights.
You can also enjoy it as part of a vegetarian main course, but if you want to try something different, we have plenty of other recipes here at HowStuffWorks that will help you find what you’re looking for!
What Is Chicken Keema?

Chickens aren’t native to India, but they were brought over by traders centuries ago.
Chicken keema originated from these early immigrants, who used them instead of game birds like pheasant or venison because they tasted more similar to beef.
Today, most people use chicken thighs or legs for their chicken keema dishes, though breasts work just fine too.
Grounding the chicken before making the sauce helps to keep the protein moist while adding some extra flavor.
It’s important not to overcook the chicken when cooking this dish, otherwise the meat will get tough and dry out.
Ground poultry cooks faster than whole pieces do, so be careful not to leave the pot unattended once the browned bits start sticking to the bottom of the pan.
Once the sauce is cooked down and thickened slightly, stir in fresh chopped cilantro and serve hot with basmati rice.
This versatile dish pairs well with many sides like naan bread and yogurt-based raita (Indian relish), but don’t forget about our delicious mango lassis either!
What Are The Ingredients In Chicken Keema?
Ground chicken, onion powder, garlic powder, ginger powder, turmeric, chili flakes, salt, black pepper, cayenne pepper, tomato paste, coriander leaves, fresh green chilies, and oil are the key ingredients in this tasty curry.
The first thing you need to know about making chicken keema is how much spice goes into each serving.
If you like things hot, use half of the amount of cayenne pepper called for in the recipe below.
But if you prefer milder dishes, feel free to double up on the cayenne pepper instead of using less.
If you want to take your chicken keema to another level, consider adding some red lentils to add protein.
Lentils are packed with fiber, iron, magnesium, and zinc, which are important nutrients for keeping your body healthy.
They also contain B vitamins such as thiamin (vitamin B1), niacin (vitamin B3), pantothenic acid (B5), riboflavin (vitamin B6), folic acid (folate), biotin (vitamin B7), and vitamin C.
You may also be interested in these delicious and nutritious foods for kids that include lentils.
Next, let’s talk about the vegetables used in this classic Indian dish.
- Onions – These yellow-white bulbs are excellent sources of Vitamin C, folate, potassium, copper, manganese, phosphorus, sulfur, and several essential minerals including calcium, iron, magnesium, sodium, chloride, boron, molybdenum, and zinc.
- Tomatoes – Tomatoes provide more than just antioxidants. In addition to providing lycopene, the pigment responsible for their bright color, they offer lots of health benefits as well, especially when eaten raw. They contain antioxidants, anti-inflammatory compounds, and even cancer fighting properties.
- Garlic – Garlic contains powerful antibacterial agents, while its antioxidant content protects against oxidative damage caused by free radicals. It’s also rich in selenium, a mineral that helps keep our immune system strong.
- Ginger – Ginger provides many health benefits. Its active ingredient, zingiberene, fights inflammation and pain due to arthritis, diabetes, osteoporosis, and heart disease. And, according to studies conducted in India, ginger reduces nausea and vomiting associated with motion sickness and morning sickness during pregnancy.
- Green Chilis – Green chilies come in many varieties, and each one offers unique tastes and textures. Some people love them hot, others prefer them mildly spiced, and still others don’t care for them at all. The capsaicin found in peppers can stimulate blood flow and increase metabolism, plus they are loaded with Vitamin C, beta-carotene, and antioxidants, among other beneficial nutrients.
- Coriander Leaves – Coriander seeds were originally used in ancient Egypt to treat malaria and fever. Their healing powers continue today as scientists discover new ways to harness their medicinal properties.
For those who love bold flavors, chicken keema is the perfect dish to turn to when you need a little extra heat.
Try it out once and see how it changes over time because the taste does change based on cooking technique.
How Do You Make Chicken Keema?
To begin, you need to gather the right tools for making chicken keema.
These include the following items:
- A large skillet
- Large saucepan
- Medium-sized pot
- Meat grinder
- Food processor
You’ll also need some fresh herbs like cilantro, coriander, mint, basil, and parsley.
Lastly, you must have one onion (chopped) and two medium-sized red bell peppers (seeded).
Step 1: Preparing the vegetables
Chop up half of one onion into small pieces and set aside.
Chop up the rest of the onion and dice the green pepper.
Peel the skin off the remaining onion and cut it into thin strips.
Now place the chopped onions and diced peppers in separate bowls.
Add salt and black pepper to both bowls and mix well.
Step 2: Chopping raw meat
Next, grab your meat grinder.
It should be big enough to handle about 3 pounds of chicken thigh meat.
If you don’t have a meat grinder, use a food processor instead.
Place the chicken thighs inside and pulse until they become very fine—you may even see little bits of white fat.
Be careful not to overprocess them because you’ll end up losing too much moisture.
Once the chicken is finely ground, transfer the mixture to a bowl and let cool completely before moving onto step three.
Step 3: Making the masala paste
In another bowl, combine the ground chicken with the prepared onions, garlic powder, turmeric, chili powder, ginger, and cinnamon.
Mix thoroughly using your hands.
The next thing you need to do is prepare the spice blend called garam masala.
To do this, take a mortar and pestle and grind together all of the spices listed below.
Set them aside while you add the oil to the pan.
- 1/4 teaspoon each of freshly ground black pepper and nutmeg
- 1 tablespoon of cumin seeds
- 1 tablespoon of coriander seeds
- 1 tablespoon of fennel seeds
- ¼ cup of dry mango powder
- ½ cup of cashews
- ½ cup of dried coconut flakes
- 2 teaspoons of cardamom pods
- 1 whole clove
Step 4: Cooking the chicken keema
Heat the oil in a large, heavy skillet over high heat.
When hot, carefully pour in the chicken mixture.
Using a spatula, stir the meat around until evenly distributed throughout the entire pan.
Let cook for approximately 10 minutes without stirring, then start gently flipping every few seconds with the spatula to ensure even cooking.
After ten minutes, check the underside of the meat by lifting up the edge.
If there’s any browning happening underneath, reduce the heat slightly.
Continue cooking until most of the liquid evaporates and the chicken starts sticking to itself.
At this point, lower the temperature to medium low and continue to flip the meat every few seconds until cooked through.
Once the chicken has reached 165 degrees F in the center, remove it from the stovetop and cover loosely with aluminum foil.
Allow it to sit for five minutes, then uncover and allow it to finish cooling down naturally.
Serve warm.
What Is The History Of Chicken Keema?
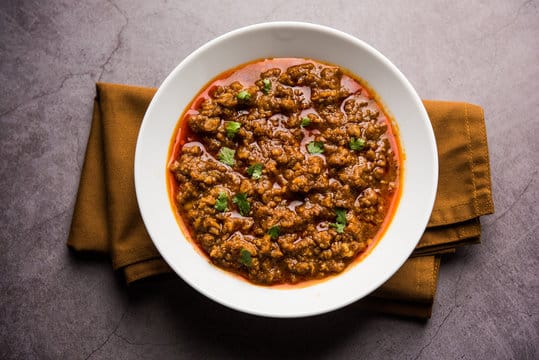
While most people know about chicken tikka masala and chicken biryani when they think of Indian cuisine, there’s another classic dish in India called chicken keema (sometimes spelled kheema).
It’s usually served over rice, but sometimes it’s eaten plain like a dip.
The origins of chicken keema date back centuries ago, though the exact age isn’t known.
Some historians believe it was brought into existence by Muslim traders who settled in northern regions of present-day Pakistan.
In fact, the word keema comes from the Persian word gheeam, which translates loosely to “butter.”
Historians say that during these early years, chicken keema wasn’t just a staple food, but also a medicine used to treat colds and coughs.
Chicken keema was actually one of the first dishes ever recorded in the Mughal Empire, so it became popular among royalty.
Over time, the popularity of chicken keema grew and spread throughout Asia.
Today, many countries across South Asia prepare their own versions of this delicious curry dish, including Bangladesh, Nepal, Pakistan, Sri Lanka, and even Afghanistan.
If you’ve never tried chicken keema before, now is definitely the time to give it a shot.
This recipe below shows how to create the ultimate taste experience.
What Are Some Variations Of Chicken Keema?
There are many different ways to make chicken keema, including using beef instead of chicken, adding more vegetables like potatoes or cauliflower, making smaller portions, or even cooking in individual servings.
Here are some common variations of chicken keema:
- Ground chicken in tomato sauce
- Ground chicken in a creamy yogurt-based sauce
- Ground chicken cooked into small balls (or patties) and served over rice
- Ground chicken simmered in coconut milk
- Ground chicken sautéed with potatoes
You’ll see these variations throughout India, where they often appear together in a single dish called dal makhani.
How do I cook chicken keema?
The best way to prepare chicken keema is by simmering chunks of onion and garlic in oil until soft before adding cubed chicken breast and stirring constantly for about 10 minutes.
Then add fresh tomatoes, coriander seeds, turmeric powder, and salt, followed by water, and bring everything to a boil.
Turn down the heat to low, cover, and let it simmer for 20 to 30 minutes, stirring occasionally.
Add garam masala, cayenne pepper, and lemon juice, then remove from the heat and set aside while you finish preparing the rest of the ingredients.
To thicken the sauce, pour off any excess liquid, stir in a little cornstarch dissolved in water, then return the skillet to medium heat and stir constantly for another minute or two.
Remove from the heat and keep warm until ready to eat.
If you’d prefer not to use canned tomatoes, you can substitute fresh ones instead.
To save time, you can chop up one large tomato right after cutting it open and squeeze out the pulp through cheesecloth.
Then mix the strained juice with enough water to create a thin paste, which will be used as a base for the chicken keema.
What Are Some Popular Dishes That Use Chicken Keema?
There are many ways to prepare chicken keema.
Some people like to marinate their chicken in yogurt before cooking it, while others prefer to cook the chicken without any additional preparation.
Regardless of how you decide to make chicken keema, it’s always best to start by browning the meat first so that the fat absorbs into the meat through searing heat.
Once the meat has been cooked, add onions and garlic to the pan along with chopped tomatoes and spices.
Cook until the vegetables soften, then remove the mixture from the heat and allow it to cool slightly.
Once the ingredients have cooled down, take them out of the fridge and place them in a food processor.
Pulse everything together until it becomes a paste-like consistency.
Be sure not to overprocess because you don’t want to lose too much moisture or get rid of the texture of the chicken.
Now comes the fun part — adding the chicken back into the mix.
If you feel comfortable using whole pieces of chicken, do so.
However, if you’d rather go with ground chicken, just grind up the entire package of chicken breasts (or thighs) in a food processor until it resembles small crumbles.
Combine both types of chicken in a large bowl, mixing well to ensure they are evenly distributed throughout the mixture.
What Are Some Tips For Making The Perfect Chicken Keema?
Ground meat is one of the most versatile ingredients in cooking because it cooks up quickly without drying out like larger cuts of meats would.
But don’t let that fool you into thinking that ground meat doesn’t require special care while preparing it.
Ground beef needs a little extra love to keep it tender, juicy, and flavorful after being cooked.
Here’s how to make sure you get it right every time.
- Use fresh, high-quality meat. If you buy frozen meat, be sure to thaw it completely before using it. A few hours in the fridge should be enough, depending on the size of the package.
- Don’t overmix the meat. When grinding meat together, avoid mixing until it turns into small pieces instead of clumping together. Overly processed meat tends to dry out more than underprocessed meat does, which defeats the purpose of having such a moist ingredient in the first place.
- Use fat. Fat keeps meat tender by keeping moisture inside. You need about 1 tablespoon per pound (450 grams) of meat to add to the mix. So just take any excess fat off the pan once the meat starts browning, but never discard it entirely – you’ll need it later.
- Add salt early. Salt brings out the natural juices in the meat, which helps prevent it from getting too dry during cooking. However, not all meat tastes good with lots of salt added to it. Add salt gradually, tasting the food throughout the process to see where you stand.
- Keep the heat low. Cooking ground meat takes longer than regular cut meat does, so you might think you’d cook it faster. However, the opposite can happen when you increase the temperature too much. Meat becomes tough and chewy rather than soft and juicy, especially if you’ve added too many seasonings. Keep the heat between medium and low at all times.
How Do You Know When Chicken Keema Is Done?
You don’t actually need to cook chicken keema until it reaches 160 F (71 C).
Instead, you should start cooking it once you add the meat to the pot.
Once you mix in the onions and seasonings, you can begin cooking it immediately.
The process takes about 30 minutes total, including 10 minutes of simmering time.
Afterward, you may need to let it cool down before serving it.
It will continue to cook slightly after being removed from the heat.
What Are Some Common Mistakes People Make When Making Chicken Keema?

The most important thing to remember when cooking any kind of curry is not to overcook your food.
Curry dishes should be cooked until everything in them is tender enough to eat without chewing — otherwise they lose their special texture and taste.
Another mistake people often make with curries is adding too much water while cooking them.
If you add too much liquid to your curry, it won’t cook down properly.
You’ll notice that most chicken keema recipes call for about 1/2 cup (120 ml) of water per pound (454 g) of meat.
That’s because you need to ensure there’s enough moisture in the meat to keep it tender, which helps the sauce cling to it, rather than falling off during cooking.
Finally, don’t buy pre-packaged frozen ground meat. It might look appealing, but it lacks both flavor and texture compared to fresh ground meat.
Make sure to buy ground meat only from reputable online sources like Amazon, Walmart, Costco, etc., where you can rest assured the quality will be high.
If you’d prefer to use store bought ingredients instead of grinding up your own meat, check out our guide to buying the best canned tomato products for even more options.
What Are Some Serving Suggestions For Chicken Keema?
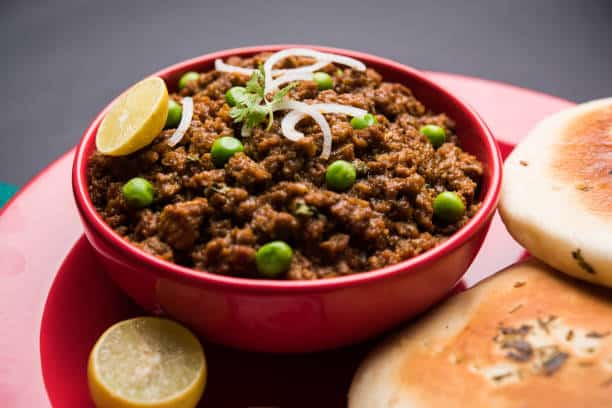
You can eat chicken keema by itself, but it tastes even better served over rice alongside naan bread (or roti).
Chicken keema pairs well with almost any vegetable or protein side dishes.
Ingredients
Chicken
- 2 pounds chicken mince
Ingredients for keema
- 4 tablespoon oil
- 1 bay leaf
- 1 inch cinnamon stick
- 7 cloves
- 7 black peppercorn
- 2 tablespoon chopped garlic
- 1 tablespoon chopped ginger
- 2 cup chopped onions
- 2 teaspoon salt divided
- 2 – 4 chopped green chillies
- 1 tablespoon garam masala powder
- 1 tablespoon coriander powder
- 1 teaspoon cumin powder
- 1 teaspoon black pepper powder
- 1 teaspoon red chilli powder
- ¼ cup yogurt
- ½ cup chopped coriander leaves
Instructions
- 1 bay leaf, 1 inch cinnamon stick, 7 cloves, and 7 black peppercorns should be added to 4 tablespoons of oil in a broad bottomed skillet and lightly roasted for 1-2 minutes until they begin to emit a faint aroma.
- Then, add 2 tablespoons of finely chopped garlic and 1 tablespoon of finely chopped ginger, and roast for 1 to 2 minutes, or until they begin to become light crimson.
- Add 2 cups of finely chopped onions, 1 teaspoon of salt to help the onions brown more quickly, and 2 green chilies, also finely chopped. Cook the onions until they are a pale golden colour. In a large pan, this can take ten minutes.
- Add the masalas once the onions have finished cooking (1 tablespoon garam masala powder, 1 tablespoon coriander powder, 1 teaspoon cumin powder, 1 teaspoon black pepper powder, 1 teaspoon chilli powder). Mix thoroughly and fry the masalas for 1-2 minutes, until they are just starting to lighten in color. To prevent the masalas from burning, it is preferable to spray a few spoons of water here, if necessary.
- The remaining salt (1 teaspoon), 1/4 cup yogurt, and 2 pounds of chicken mince are now added. Mix thoroughly.
- Cook covered for 20–25 minutes on medium heat while stirring occasionally, or until the chicken is thoroughly cooked.
- Serve hot with rotis, chapatis, or pav and garnish with 1/2 cup chopped coriander leaves.
Video
Nutrition
My blog is all about creating delicious meals with ingredients that are easy to find in your local grocery store. I’m passionate about making yummy meals that I can share with my friends and family.